Vista JavaScript Menu provides huge collection of 1400 web buttons, 6600 icons, 300 ready-made samples, so you'll create really nice looking menus and buttons with little or nodesign skills at all! Web 2.0, Mac, iPhone, Aqua buttons, Vista, XP, transparent, round, glossy, metallic, 3d, tab menus, drop down menus will be a breeze!
With Vista Web Buttons clear and comprehensible interface, you need just 4 simple steps to get your web buttons or html menu ready and if you use a pre-designed sample as a base you'll end up even faster!
Features
Ready to use button templates and submenus themes. In the Themes toolbox you can choose selected buttons and submenu themes for web appearance.
transparent javascript dropdown menu Search Engine Friendly Vista JavaScript Menu generates html code which is transparent to search spiders.
menu slide javascript firefox onmouseover Easy to Use With Vista Web Buttons clear and comprehensible interface, you need just 4 simple steps to get your web buttons or html menu ready and if you use a pre-designed sample as a base you'll end up even faster!
menu css en frames Onmouseover Menu List Css Drop Down Menus Create drop down menus based on css using Vista JavaScript Menu. Make various styles for each submenu item adjusting css styles.
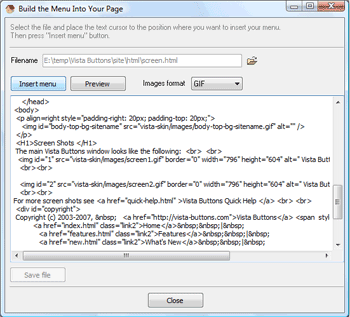
Insert button script into the existing HTML page You can insert your button script into the existing HTML page. To do so, click "Page insert" button on the Toolbar.
Orientation of the Menu Create both horizontal and vertical menus and submenus with any amount of menus on one page.
Now it is time to save your project file. Note that you are free to save your project at any time. To save project just click "Save" or "Save As" button on the Toolbar or select "Save" or "Save As" in the Main menu. The "Save as…" dialog will appear, where you should select a place you want project to be saved to, and enter the project name. After clicking "Ok", project will be saved.
Also, you can save your menu in the HTML format. To do it click "File/Save as HTML" in the Main menu. "Save As…" dialog will appear, where you should select a path you want your project HTML to be saved to, and the HTML page name. After clicking Ok, page containing your menu will be saved.
Also, you can insert your menu into the existing HTML page. To do so, click "Page insert" button on the Toolbar. "Build the menu into your page" dialog will appear. Click "Browse" button to choose a page you want to insert your menu into. After choosing a page and clicking "Ok", chosen page's HTML code will appear in the Code field of the dialog.
After that you can edit your code. Then set the cursor to the line you want menu code to be added to and click the "Insert" button. The menu code will be inserted into the page. Then you can either save the page or close the dialog without saving.
Creating a FrontPage Drop-Down Menu with JavaScript The expanded onmouseover state for the DIV element provides some ... The following code listings are included with this article to help you create a working ...
Creating a FrontPage Drop-Down Menu with JavaScript The expanded onmouseover state for the DIV element provides some ... The following code listings are included with this article to help you create a working ...
keypress using onmouseover I looked at the css list-based menu explanation, but I'm not using ... on getting the keypress.js to work for menus that use the onmouseover() approach? ...
CMSListMenu The list-based menu is better accessible. You can create the drop-down menu using the list-based menu and CSS without almost any JavaScript. ...
Positioning with CSS This example uses background color to match selected item with the flyout menu. ... For each menulist item (both the main ones and ones for the flyout menus) we ...
DropMenu Tutorial Obtaining an effective dropdown menu display with HTML lists, CSS style and JavaScript. Techniques for adding further levels of menu and dynamic menu content are included


 (please include template name in the message title)